Why Beating the First Fall Freeze Requires Early Planning
Explaining the installation timeline for a tankless water heater before winter arrives in Aurora starts with acknowledging a harsh local reality: the first freeze typically hits by mid-October. If your traditional water heater is aging, waiting until the cold weather settles in puts your home at risk of a mid-winter failure. Many homeowners assume that swapping an old tank for a new tankless system is a quick, same-day plumbing job. The reality is that moving to on-demand hot water is a comprehensive system overhaul. Because these units operate fundamentally differently than standard tanks, the installation involves multiple phases, municipal oversight, and infrastructure updates. To ensure your home is ready for the cold, you must understand this multi-day logistical timeline and schedule your upgrades proactively during early fall.
For a deeper dive into your options, check out our guide on tankless vs traditional water heaters, or learn more about the specific challenges of installing a tankless water heater in an older home.
September pre-winter prep is the ideal window for this project. When comparing a standard tank replacement to a tankless conversion, the installation complexity represents the most significant upfront difference. Traditional tanks hold heated water in reserve, steadily using a relatively low amount of energy. Tankless systems flash-heat water on demand, which requires a massive, instantaneous energy draw. This functional difference dictates the entire installation timeline. Because older homes were built around the low-draw requirements of traditional tanks, upgrading to a tankless unit almost always requires modifying the surrounding infrastructure before the new unit can even be mounted to the wall.
The One-Day Installation Myth: Understanding the System Overhaul
The common misconception: Many homeowners believe a plumber can arrive at 8:00 a.m. with a tankless unit and leave by noon with the system fully operational.
The underlying reality: A tank-to-tankless conversion is a multi-trade project. It requires specialized plumbing, gas fitting, electrical modifications, and oversight from the Aurora municipality. Replacing a like-for-like traditional tank takes a few hours because the existing gas lines, exhaust vents, and water pipes already match the unit's requirements. A tankless upgrade requires a phased approach that stretches over several days or even weeks of preparation before the final installation day.
The safe solution: Setting realistic expectations is the first step toward a successful upgrade. While physically mounting the new unit and connecting the final pipes only takes hours, the preparatory steps—assessing infrastructure, pulling permits, and upgrading utilities—take time. Rushing this process or attempting to bypass required municipal steps just to get hot water faster often leads to code violations, safety hazards, and premature system failure.
Why Infrastructure Must Change
Tankless systems demand higher immediate energy draws to heat water instantly as it flows through the heat exchanger. Existing homes rarely have the required gas line capacity or venting infrastructure pre-installed.
• Average Timeline — Traditional Tank Replacement: 2 to 4 hours — Tankless Conversion: Multiple days (phased)
• Gas Line Requirements — Traditional Tank Replacement: Uses existing 1/2-inch lines — Tankless Conversion: Often requires a 3/4-inch upgrade
• Venting System — Traditional Tank Replacement: Standard atmospheric metal flue — Tankless Conversion: Dedicated PVC or concentric venting
• Trades Involved — Traditional Tank Replacement: Plumbing — Tankless Conversion: Plumbing, Gas, Electrical
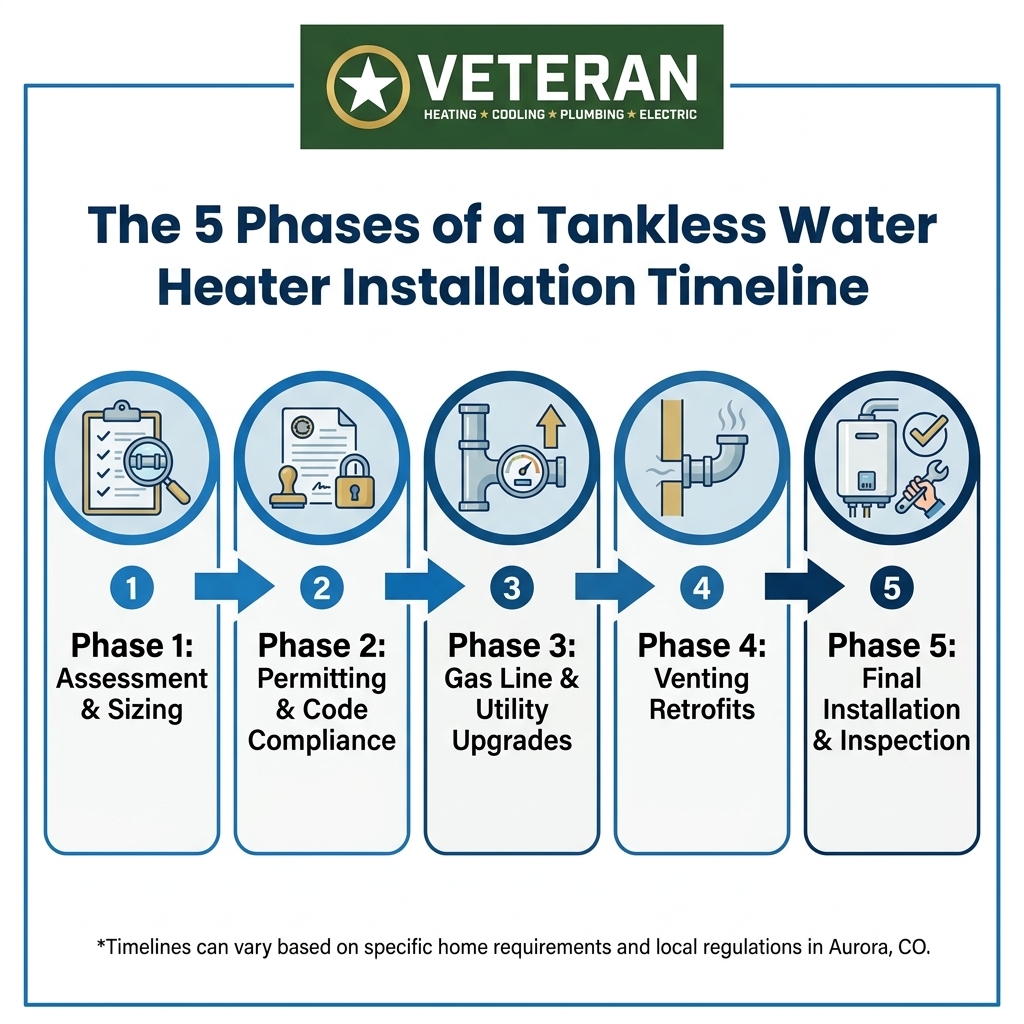
Phase 1: Comprehensive Assessment and System Sizing
The timeline officially begins with a thorough in-home evaluation. Before any tools are lifted, professionals must calculate your home's exact requirements and evaluate the current infrastructure. This assessment ensures the system will perform reliably during cold weather.
1. Peak Demand Calculation: Technicians evaluate your home's typical simultaneous hot water usage. They look at the number of bathrooms, high-flow fixtures, and typical daily routines to size your water heater properly. An undersized unit will struggle to keep up, while an oversized unit wastes resources.
2. Electrical Panel Assessment: Even gas-powered tankless water heaters require electricity. They use electronic control boards, digital thermostats, and internal freeze-protection sensors. Technicians check your electrical panel to ensure there is a dedicated circuit with sufficient amperage to handle these components without tripping breakers.
3. Gas Line Inspection: The initial evaluation includes a strict review of your current gas delivery system. Traditional tanks usually operate on a 1/2-inch gas line because their BTU (British Thermal Unit) load is relatively low and steady. Tankless units require a massive surge of BTUs to heat water instantly, which means the technician must determine if your current pipe diameter can handle the increased load.
4. Location Strategy: The physical location of the unit is mapped out. Because tankless units mount to the wall and require specific venting routes, the old tank's footprint might not be the most efficient location for the new system.
Completing this assessment as part of your September pre-winter prep gives you ample time to address any necessary upgrades without the pressure of a broken heater.
Phase 2: Navigating Aurora Municipal Permits and Code Requirements
Once the assessment is complete and the system is sized, the project enters the administrative phase. This is where the timeline often stretches beyond a homeowner's initial expectations, as local building codes strictly govern gas appliance installations.
The Aurora municipality requires specific building permits for water heater replacements and gas line modifications. Permit processing adds administrative time to the project calendar before any physical work can begin. The city reviews the proposed plans to ensure they meet stringent local municipal code requirements, particularly concerning high-efficiency appliance venting and gas line safety.
The military-grade difference: Working with a veteran-owned company means you benefit from the same level of discipline, precision, and accountability that military service demands. Complex project management and municipal permitting are handled efficiently and methodically. There is no cutting corners. Every permit is filed correctly the first time, preventing administrative delays from pushing your installation timeline deeper into the cold season.
Skipping the permitting phase to save time is never an option. Unpermitted gas work violates local regulations, compromises your home's safety, and can void the manufacturer's warranty on your new equipment. The administrative timeline is a necessary step to ensure the final installation is safe, legal, and reliable.
Phase 3: Gas Line Upgrades and Utility Coordination
The logistical hurdle: One of the most variable parts of the installation timeline involves upgrading the gas delivery infrastructure. As identified during the assessment phase, converting from a traditional tank to a high-efficiency tankless system frequently requires upgrading the gas line from a standard 1/2-inch pipe to a larger 3/4-inch pipe.
The coordination challenge: It is not just about the pipes inside your home. The total gas load of your property must be calculated. If your new tankless unit pushes the total BTU demand beyond what your current gas meter can supply, you will need to coordinate with utility providers like Xcel Energy to upgrade the meter itself.
The proactive solution: Scheduling utility upgrades introduces external variables into the timeline. Utility companies operate on their own schedules, which can add days or even weeks to the overall project. This is exactly why initiating the process early in the fall is critical. Completing these gas infrastructure upgrades before the peak heating season begins ensures you are not left waiting for utility coordination while the temperatures drop.
The Role of Your Gas Meter
A standard residential gas meter is sized to support a typical load: a winter furnace, a gas stove, and a standard water heater. When you replace a 40,000 BTU standard tank with a 199,000 BTU tankless unit, the meter may not support both the new water heater and a running winter furnace simultaneously. Upgrading the meter is a strict requirement for safety and performance, and the utility coordination phase must be factored into your timeline.
Phase 4: Venting Retrofits for Harsh Winter Climates
Proper ventilation is a non-negotiable safety requirement for any gas combustion appliance. The timeline must account for the structural work needed to route new exhaust and intake pipes safely to the home's exterior.
Traditional tanks typically use atmospheric venting, which relies on natural drafts to push hot exhaust gases up a vertical metal flue and out the roof. High-efficiency tankless units extract so much heat during the combustion process that the resulting exhaust gases are relatively cool. Because these cooler gases lack the thermal buoyancy to rise naturally, the unit must use a powered fan to push the exhaust outside, usually through dedicated PVC or concentric venting pipes.
Why September pre-winter prep matters: Venting retrofits often require cutting new holes through exterior walls or the roof. This exterior structural work is much easier, safer, and faster to complete in September before ice and snow accumulate on roofs and siding. Navigating icy rooflines to install new exhaust vents slows down the installation process significantly.
Furthermore, upgrading to a tankless water heater in Aurora requires specific freeze-protection installation techniques. With freezing winter temperatures and sudden cold snaps, proper venting design is critical. If cold drafts enter the exhaust pipe, they can freeze the small amount of water resting inside the unit's heat exchanger, causing it to burst. Technicians must carefully plan the venting route, install backdraft dampers, and verify the unit's internal freeze-protection sensors to protect the system against the harsh climate.
Phase 5: Execution, Inspection, and Finalizing Your Upgrade
After the assessment is complete, permits are pulled, gas lines are upgraded, and venting plans are finalized, the actual physical installation day arrives. This phase is the culmination of all the previous preparatory work.
1. System Removal: The installation day begins by draining, disconnecting, and removing the heavy, outdated traditional tank from your home.
2. Mounting and Connection: The new tankless unit is securely mounted to the wall. The technician connects the upgraded gas lines, the new PVC venting, the electrical supply, and the hot and cold water lines. Isolation valves are installed to allow for future maintenance and descaling.
3. System Testing: Once connected, the system is powered on and tested. The technician verifies the gas pressure, checks the venting for proper airflow, and ensures the water reaches the set temperature instantly and consistently.
4. Municipal Inspection: The timeline does not end when the hot water turns on. The Aurora municipality requires a mandatory post-installation inspection. A city inspector will visit your home to verify that the gas connections, venting, and electrical work all meet local building codes. Once the inspector signs off, the permit is officially closed.
Proactive late-summer home maintenance follows a distinct pattern. Just as you wouldn't wait to find out late summer tree roots invade your Aurora sewer line before taking action, you shouldn't wait for a winter freeze to test your hot water reliability. Completing this final phase before the cold weather sets in guarantees your home is protected.
Frequently Asked Questions About Tankless Timelines
How long does it take to switch from a tank to a tankless water heater?
The total timeline usually spans a few weeks from the initial consultation to the final municipal inspection. While the physical installation of the unit takes only 4 to 8 hours, the preparatory phases take much longer. Upgrading gas lines, securing local permits, and coordinating with utility companies dictate the overall schedule.
Can a tankless water heater be installed in one day?
A tankless water heater can only be installed in one day if all infrastructure upgrades and permits are already in place. If you are replacing an existing tankless unit with a similar model, a one-day turnaround is standard. However, converting from a traditional tank to a tankless system requires days or weeks of preparation before the final installation day.
Do I need a permit to install a tankless water heater in Aurora?
Yes, building permits are strictly required by the local building division for any water heater replacement. Because a tankless conversion involves modifying gas lines and altering exhaust venting, the city must review the plans and inspect the final work. Skipping this step violates municipal code and compromises safety.
What is required to upgrade my gas line for a tankless water heater?
Most standard tanks use a 1/2-inch gas line, but tankless units typically require a 3/4-inch line to handle the higher BTU demand. A technician must replace the piping from the meter to the unit. In many cases, the gas meter itself must also be upgraded by the utility company to support the increased total load of the home.
How far in advance of winter should I schedule a tankless water heater installation?
You should initiate the process in early September. Because utility coordination and permit approvals can introduce variable delays, starting in early fall ensures the project is completely finished, inspected, and fully operational before the first major freeze hits in mid-October.
Will my current electrical panel support a tankless water heater?
Gas-powered tankless units require a standard 120-volt electrical outlet to operate their digital displays, electronic ignitions, and internal freeze-protection systems. Most modern electrical panels can easily accommodate this low-amp draw, but a technician will verify that a dedicated circuit is available during the initial in-home assessment.
Secure Your Home's Hot Water Supply Before Winter
A proper tank-to-tankless upgrade is far more than a simple plumbing swap. It is a carefully coordinated, multi-phase project that involves assessing infrastructure, navigating municipal codes, upgrading gas lines, and retrofitting exhaust vents. Understanding this timeline is the key to a stress-free installation. When you recognize that utility coordination and permit approvals take time, the necessity of starting the process in early fall becomes clear.
September pre-winter prep is your best defense against cold-weather breakdowns. Initiating the assessment phase now ensures that every logistical hurdle is cleared well before the freezing temperatures arrive. There is immense satisfaction in knowing your home is equipped with a reliable, high-capacity, energy-efficient system that has been installed safely and legally. Secure your home's hot water supply today by scheduling your initial assessment and taking the first step toward endless hot water.
ABOUT Veteran Heating, Cooling, Plumbing & Electric
Veteran Heating, Cooling, Plumbing & Electric was founded on the belief that service should be personal, honest, and community-focused. Our team is built around integrity, professionalism, and a true commitment to your home’s comfort and safety.
Led by a U.S. Army veteran with over 30 years of industry experience, we’re proud to remain locally owned and operated. Every technician, plumber, and electrician is EPA-certified, background checked, and driven to exceed expectations.
- 24/7 ServiceWe offer weekend & 24/7 emergency service. We’re here whenever you need us—day, night, or weekend, no exceptions.
- $0 Trip FeesNo dispatch or trip fees. You’ll never pay just for us to show up—service starts when the work does.
OUR SERVICES
AIR CONDITIONING
.jpg)
We offer specialty and seasonal services like indoor air quality upgrades, pre-winter furnace checks, and summer AC tune-ups to keep your home prepared year-round.
Our Primary Air Conditioning Services Include:
Don't see the service you need? Call our Team today!
PLUMBING
From leaks to full system installs, our plumbing services cover everything you need for a safe, reliable home water system, 24/7.
Our Primary Plumbing Include:
- Water Heater Replacement
- Water Heater Repair
- Trenchless Sewer Line
- Water Filtration
- Slab Leak
- Sewer Line Repair
Don't see the service you need? Call our Team today!
ELECTRICAL

Our electrical services ensure your home stays safe and powered, from routine fixes to complete system upgrades.
Our Primary Electrical Services Include:
- House Rewiring
- Electrician
- Electric Panel Upgrade
- Electric Panel Replacement
- EV Chargers
- Whole House Generator
Don't see the service you need? Call our Team today!
HEATING
.jpg)
We install, repair, and maintain heating & furnace systems with expert care to keep your Colorado home comfortable and energy-efficient year-round.
Our Primary Heating Services Include:
- Heating Installation
- Heating Replacement
- Heating Maintenance
- Heating Repair
- Heating Service
- Heating Tune-Up
Don't see the service you need? Call our Team today!