Why Proper Plumbing Fixture Installation Matters for Your Home
Proper plumbing fixture installation is a high-impact home improvement that improves your home's look and function while preventing costly water damage. Whether you're updating a faucet or renovating a bathroom, the right installation ensures years of reliable service.
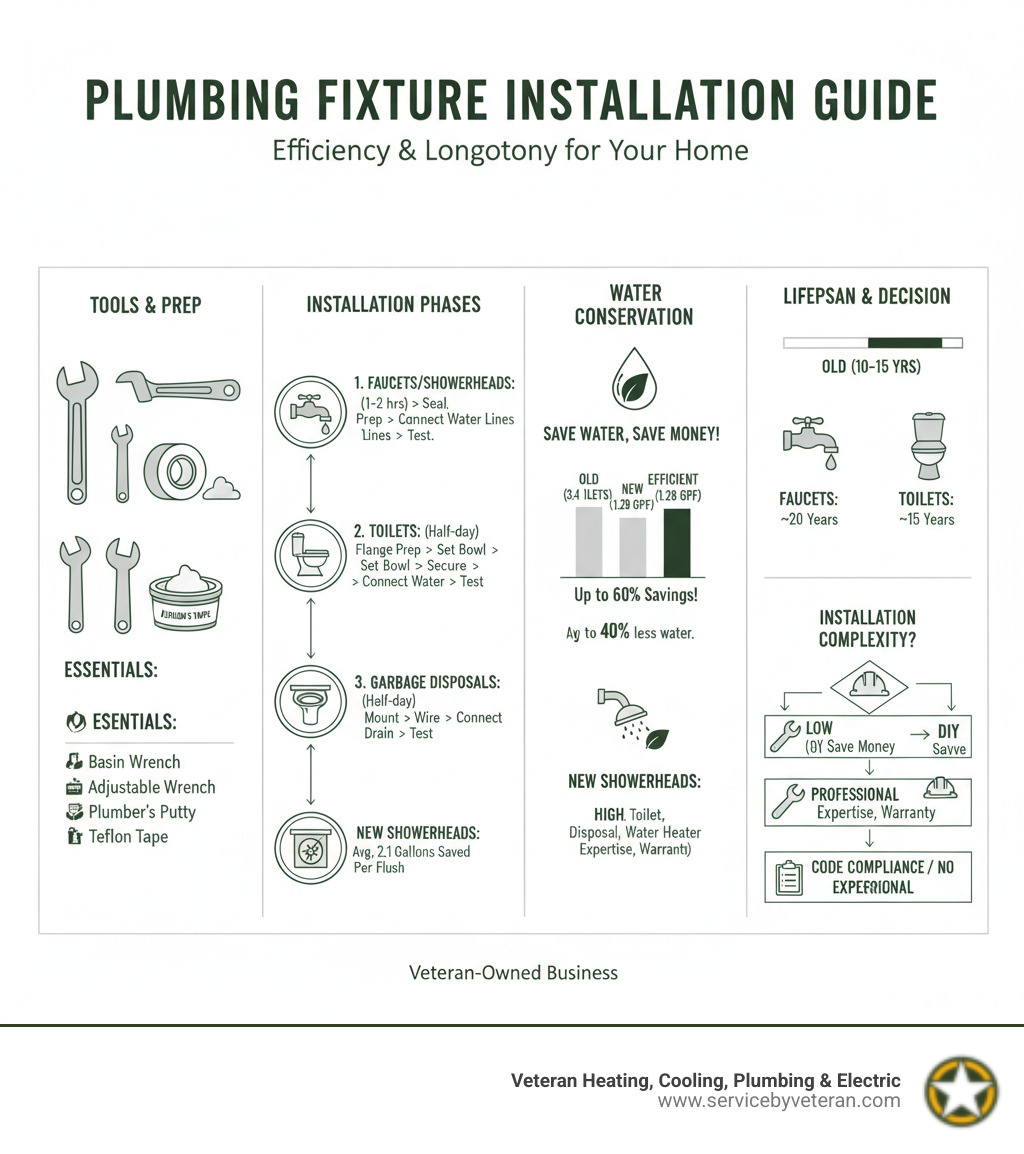
Quick Service Guide for Plumbing Fixture Installation:
- Simple fixtures (faucets, showerheads): 1-2 hours installation time
- Complex fixtures (toilets, garbage disposals): Half-day to full-day project
- Essential tools needed: Basin wrench, adjustable wrench, plumber's putty, Teflon tape
- When to call professionals: Water heater installation, code compliance, warranty protection
- Average fixture lifespan: Faucets (20 years), toilets (15 years)
Modern upgrades also offer significant benefits. New water-efficient fixtures can cut your water usage in half, as today's high-efficiency toilets use far less than the 3.4 gallons per flush of older models. Correct installation also prevents leaks that can cause damage as costly as fire repairs. The choice between DIY and professional installation depends on complexity, your experience, and local code requirements.
I'm Mike Townsend. My eight years in the U.S. Army managing precision cooling systems taught me that attention to detail is critical. In plumbing fixture installation, that same precision means the difference between a system that works for decades and one that fails unexpectedly. Our veteran-owned team brings this meticulous approach to every job, ensuring your fixtures perform reliably for years.
Getting Started: Tools, Materials, and Fixture Types
A successful plumbing fixture installation depends on having the right tools and materials before you begin. Proper preparation is the difference between a smooth project and a frustrating mess.
Essential Tools and Materials
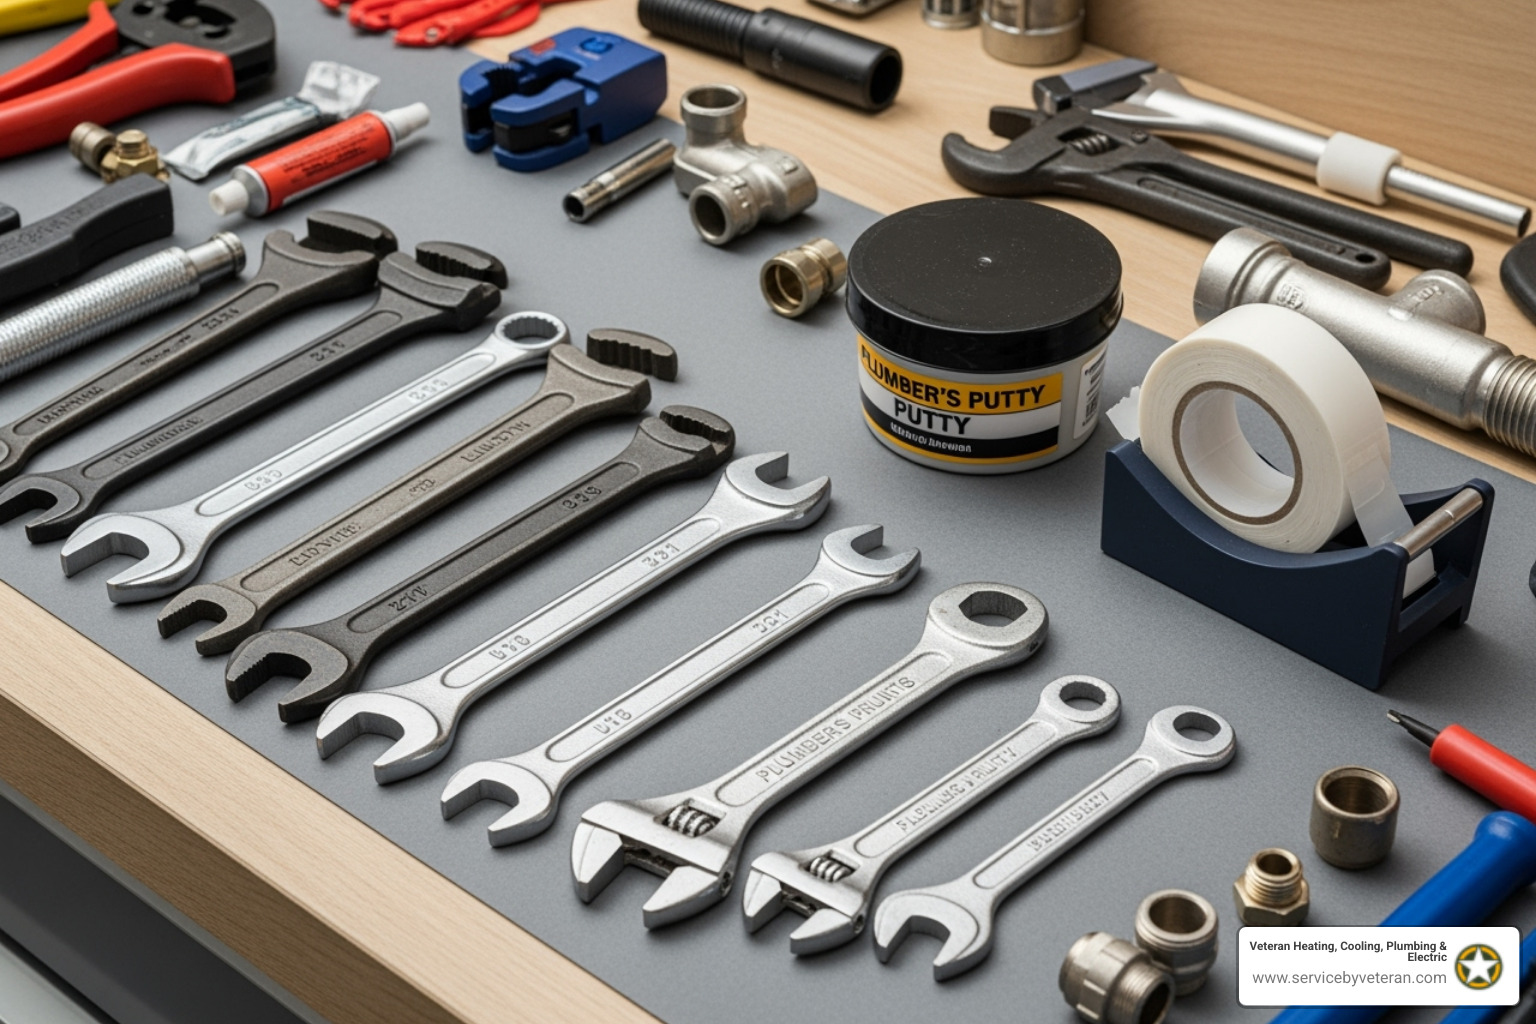
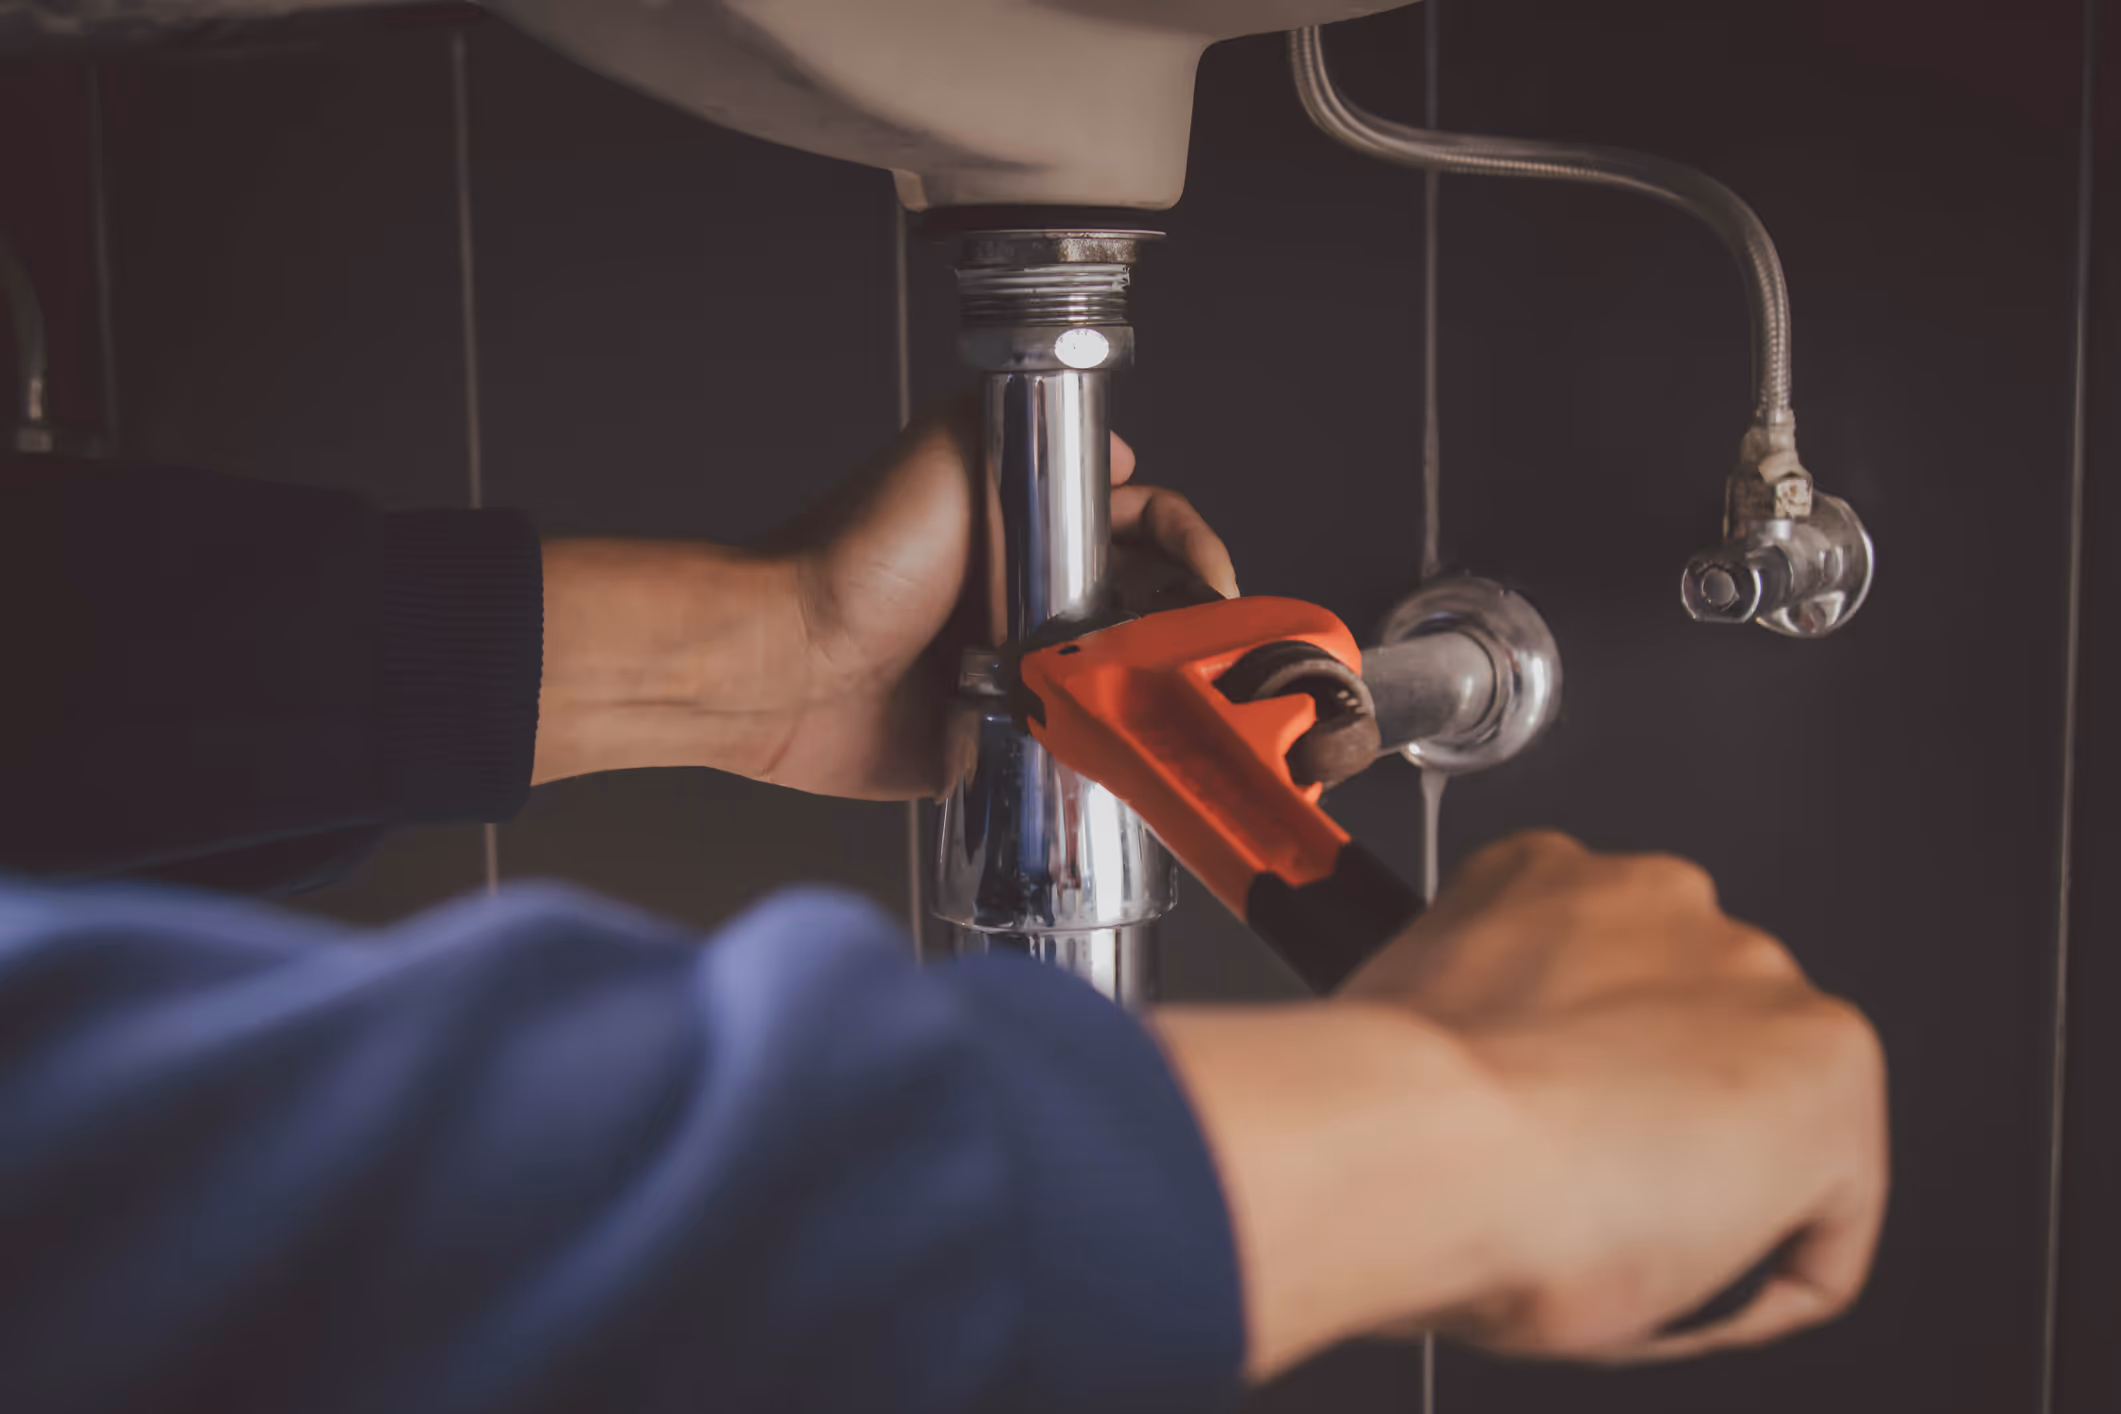
The right tool prevents problems before they start. An adjustable wrench handles most nuts and bolts, but a basin wrench is essential for reaching the hard-to-reach nut behind a sink. You'll also need channellock pliers, a screwdriver set, and a utility knife for gripping, securing, and cleaning. A level and tape measure ensure proper alignment, while buckets and rags are a must for managing water spills.
For creating watertight seals, have plumber's putty for non-pressurized connections, Teflon tape for threaded joints, and silicone caulk for a final waterproof barrier.
Pro Tip: Always use braided stainless steel supply lines instead of plastic ones. They are far more resistant to bursting and corrosion. For toilets, you'll need a new wax ring or waxless seal.
Essential Tools and Materials Checklist:
- Basin wrench and adjustable wrench
- Plumber's putty and Teflon tape
- Silicone caulk and gaskets
- Buckets, rags, and cleaning supplies
- Level, tape measure, and drill
- Braided stainless steel supply lines
Common Fixture Types
Understanding your fixture is key.
- Faucets and Sinks: Faucets range from single-handle to widespread models. Sinks come in various styles like drop-in, undermount, or vessel, each with unique installation needs.
- Toilets: Available in one-piece, two-piece, and dual-flush models, the main installation challenge is properly setting the wax ring seal.
- Showers and Tubs: These offer the most variety, from fixed showerheads to freestanding tubs, and often present more complex installation challenges.
- Kitchen and Utility: Garbage disposals require careful electrical and mounting work. Water heaters are the most complex and typically require a professional. Other fixtures include washing machine hookups and water filtration systems.
Room-by-Room Installation Guides
This section provides a high-level overview of plumbing fixture installation in key areas of the home. For any DIY project, always consult the manufacturer's instructions.
Key Steps for Bathroom Plumbing Fixture Installation

Faucet and Sink Installation
Always shut off the water supply before starting. Use a basin wrench to remove the old faucet's mounting nuts in tight spaces. When installing the new faucet, ensure it matches your sink's hole configuration (centerset, widespread, or single-hole). Apply plumber's putty or silicone caulk as directed to create a watertight seal. Connect new, durable braided stainless steel supply lines. For sinks, ensure a new drop-in model fits the existing cutout, and use a strong waterproof silicone seal for undermount sinks.
Toilet Installation
Upgrading to a new high-efficiency toilet can cut water usage from over 3 gallons per flush to just 1.28. The process involves removing the old toilet, cleaning the flange, and installing a new wax ring or waxless seal. Use plastic closet bolts to prevent rust and avoid over-tightening, which can crack the porcelain. Tighten bolts alternately to keep the toilet level. Building codes require caulking around the base to prevent water and grime from getting underneath.
Shower and Tub Fixtures
These installations are more complex, often taking half a day or more for a DIYer, as they involve working inside walls. We recommend separate 3/4-inch lines for showers and tubs to ensure excellent water pressure. Getting the new shower valve depth correct within the wall is critical for the trim kit to fit. Use thread seal tape on all shower arm connections to prevent hidden leaks.
Specialized Kitchen Plumbing Fixture Installation

Kitchen Faucets, Sinks, and Garbage Disposals
Kitchen faucets with pull-down sprayers need proper counterweight installation for smooth retraction. Sinks, especially heavier undermount models, require robust support. Garbage disposals must be securely mounted to the sink flange to prevent vibration and drainage issues. Proper electrical connections are vital. If you have a dishwasher, an air gap must be installed to prevent contaminated water from backing up into your fresh water supply.
Dishwashers and Water Filtration Systems
Dishwashers require a correctly installed air gap or high drain loop to prevent backflow. Water filtration systems and ice makers need dedicated shut-off valves for convenient maintenance and leak prevention.
Laundry & Utility Room Considerations
Water Heater Installation
This is not a DIY job. It requires professional expertise in electrical or gas lines, venting, and safety systems like the temperature-pressure relief valve. Professional installation ensures your family's safety and access to hot water.
Washing Machine Hookups and Utility Sinks
For washing machines, consider recessed supply boxes for a cleaner look and hammer arrestors to prevent "water hammer" noise and pipe damage. For all utility fixtures, individual shut-off valves are a smart addition for easier maintenance.
The Essentials of Plumbing Fixture Installation: Codes, Connections, and Pressure
Getting the technical details right is what separates a long-lasting plumbing fixture installation from one that fails. Knowing which sealant to use and why water pressure matters is where experience pays off.
Best Practices for Sealing and Connecting Fixtures
The secret to a leak-free installation is using the right materials in the right places.
- Plumber's Putty vs. Silicone: Use plumber's putty for drain flanges and other non-pressurized spots. Use silicone caulk for a permanent, waterproof seal around fixture bases. Never use putty on a rubber gasket, as it can cause it to degrade.
- Thread Seal Tape: Wrap this Teflon tape clockwise on threaded connections like shower arms to prevent it from unwinding as you tighten.
- Compression Fittings: Tighten these just enough to stop leaks. Over-tightening will damage the seal.
- Gaskets and Wax Rings: Every toilet installation requires a fresh wax ring for a watertight, odor-proof seal. Always replace tank-to-bowl gaskets as well.
- Proper Tightening: Tighten nuts and bolts alternately to distribute pressure evenly and prevent cracking porcelain fixtures. After installation, turn the water on slowly and check every connection for drips.
Understanding Water Pressure, Hammering, and Local Codes
Successful plumbing fixture installation requires understanding your home's water system and regulations.
Water pressure should be between 40-80 psi. Too high, and it stresses pipes; too low, and your shower is a trickle. A pressure regulating valve can solve issues with high pressure.
Water hammering, a banging sound when a faucet is shut off, indicates pressure spikes that can damage pipes. Hammer arrestors absorb these shocks and eliminate the noise.
Local code requirements ensure safety and sanitation. The International Plumbing Code mandates features like anti-scald protection in showers and proper venting to keep sewer gases out. Many areas also require water conservation fixtures. Choosing WaterSense-labeled fixtures is not just environmentally responsible—it's often legally required. Our team understands the specific codes for Colorado communities, from Denver to Fort Collins, ensuring every installation is compliant.
DIY vs. Professional Installation: Making the Right Choice
Deciding between a DIY project and calling a professional depends on the job's complexity, your experience, and the potential risks. While there's satisfaction in doing it yourself, it's important to know when to call in the experts.
The DIY Approach: Pros, Cons, and Common Pitfalls
The main appeal of DIY is cost savings on labor and the pride of accomplishment. However, a simple faucet replacement can quickly become a long ordeal. A shower or tub faucet can take an inexperienced person half a day or more. The real risks are costly mistakes like improper sealing that leads to hidden leaks, cross-threading connections, or forgetting to shut off the water. Without specialized tools like a basin wrench, simple tasks become difficult, and DIY work comes with no warranty.
The Professional Advantage: Why Hire an Expert?
For complex tasks, the benefits of hiring a professional for plumbing fixture installation are clear.
The biggest advantage is peace of mind. Our licensed plumbers work efficiently, ensuring the job is done right the first time. We are familiar with local Colorado codes, which is critical for complex jobs like water heaters. Plus, you can't get this with DIY: our lifetime warranty on parts and labor and a money-back guarantee. We arrive with all the specialized tools and offer flexible financing options for unexpected expenses.
Frequently Asked Questions about Plumbing Fixtures
Here are answers to the most common questions we receive about plumbing fixture installation and maintenance.
When should I repair a fixture instead of replacing it?
The decision to repair or replace depends on a few key factors:
- Age: Faucets typically last 15-20 years, and toilets up to 15 years. If your fixture is near or past this age, replacement is often more cost-effective.
- Cost: If a repair costs nearly as much as a new, water-efficient model, replacement is the smarter investment.
- Parts Availability: It can be difficult and expensive to find parts for older, discontinued models.
- Frequency of Problems: If you're constantly calling for repairs on the same fixture, it's time to replace it.
For minor issues like a washer replacement, a repair is fine. For major problems like cracks or corrosion, a new installation is your best bet.
What are the signs my plumbing fixture needs professional attention or replacement?
Your fixtures will give you warning signs when they need help. Look out for:
- Persistent leaks: A dripping faucet or running toilet wastes water and money.
- Visible damage: Cracks in porcelain or significant rust compromise the fixture's integrity.
- Low water pressure: Reduced flow from a single fixture can indicate mineral buildup or internal damage.
- A constantly running toilet: This is a major water waster, usually caused by a faulty internal part.
- Strange noises: Gurgling, squealing, or banging sounds (water hammering) signal underlying problems.
- Temperature inconsistencies: Sudden changes from hot to cold in a shower can indicate a failing mixing valve.
If you notice these signs, it's time to call a professional to diagnose the issue.
How does proper plumbing fixture installation contribute to water and energy conservation?
Proper plumbing fixture installation can dramatically reduce your utility bills.
- Water-Efficient Fixtures: WaterSense labeled toilets, faucets, and showerheads use significantly less water without sacrificing performance. Upgrading an old toilet can cut your water usage in half.
- Leak Prevention: A correct, professional installation with proper seals prevents leaks. A single dripping faucet can waste over 3,000 gallons per year.
- Energy Savings: An incorrectly installed water heater works harder and uses more energy. Proper installation ensures it operates efficiently, lowering your energy bills.
Investing in modern, professionally installed fixtures often pays for itself through utility savings.
Your Trusted Partner for Flawless Fixture Installation
After walking through everything from choosing the right basin wrench to understanding water pressure dynamics, you might be wondering: "Should I tackle this plumbing fixture installation myself, or call in the professionals?" It's a fair question, and honestly, the answer depends on your comfort level, available time, and the complexity of your specific project.
Simple faucet replacements might be perfect weekend projects for handy homeowners. But when you're dealing with water heater installations, complex shower valve replacements, or ensuring your project meets local code requirements, that's where our expertise really shines.
Here's the thing about plumbing fixture installation: the difference between a job done right and one that causes problems down the road often comes down to those small details we've discussed throughout this guide. Proper sealing techniques, understanding when to use plumber's putty versus silicone, and knowing how to test for leaks thoroughly—these aren't just technical skills, they're the foundation of installations that last for decades.
At Veteran Heating, Cooling, Plumbing & Electric, we bring that same attention to detail I learned during my military service to every installation. Whether you're upgrading to water-efficient fixtures to meet California's conservation requirements or simply want the peace of mind that comes with professional installation, our veteran-led team has the experience to handle projects of any size.
We stand behind our work with both a lifetime warranty on parts and labor, plus our money-back guarantee. That means if something isn't right, we'll make it right—no questions asked. It's the kind of assurance you simply can't get with a DIY approach, no matter how many online tutorials you watch.
Ready to move forward with your plumbing fixture installation? Our team serves communities throughout Colorado, from Denver and Aurora to Fort Collins and beyond. We're here to help you choose the right fixtures, handle the installation with precision, and ensure everything works perfectly from day one.
Schedule your service today by visiting our services page. Let's get your home's plumbing fixtures working exactly the way they should.
ABOUT Veteran Heating, Cooling, Plumbing & Electric
Veteran Heating, Cooling, Plumbing & Electric was founded on the belief that service should be personal, honest, and community-focused. Our team is built around integrity, professionalism, and a true commitment to your home’s comfort and safety.
Led by a U.S. Army veteran with over 30 years of industry experience, we’re proud to remain locally owned and operated. Every technician, plumber, and electrician is EPA-certified, background checked, and driven to exceed expectations.
- 24/7 ServiceWe offer weekend & 24/7 emergency service. We’re here whenever you need us—day, night, or weekend, no exceptions.
- $0 Trip FeesNo dispatch or trip fees. You’ll never pay just for us to show up—service starts when the work does.
OUR SERVICES
AIR CONDITIONING
.jpg)
We offer specialty and seasonal services like indoor air quality upgrades, pre-winter furnace checks, and summer AC tune-ups to keep your home prepared year-round.
Our Primary Air Conditioning Services Include:
Don't see the service you need? Call our Team today!
PLUMBING
From leaks to full system installs, our plumbing services cover everything you need for a safe, reliable home water system, 24/7.
Our Primary Plumbing Include:
- Water Heater Replacement
- Water Heater Repair
- Trenchless Sewer Line
- Water Filtration
- Slab Leak
- Sewer Line Repair
Don't see the service you need? Call our Team today!
ELECTRICAL

Our electrical services ensure your home stays safe and powered, from routine fixes to complete system upgrades.
Our Primary Electrical Services Include:
- House Rewiring
- Electrician
- Electric Panel Upgrade
- Electric Panel Replacement
- EV Chargers
- Whole House Generator
Don't see the service you need? Call our Team today!
HEATING
.jpg)
We install, repair, and maintain heating & furnace systems with expert care to keep your Colorado home comfortable and energy-efficient year-round.
Our Primary Heating Services Include:
- Heating Installation
- Heating Replacement
- Heating Maintenance
- Heating Repair
- Heating Service
- Heating Tune-Up
Don't see the service you need? Call our Team today!